Wednesday, August 5, 2015

Cedar shutters DIY

 "House Eyeliner"


 Cedar shutters DIY


Do you have a window in the front of your house that you pass by like "no big deal" everyday? I have one of those. The best part is its the window to my daughters' room and they have broken their awesome mini blinds into like 5 pieces. It's just ugly. No dancing around it or trying to cover it up. It's UGLY!

Well Jordan brought  home a shipping pallet a few weeks ago from work that was made of cedar!!! FREAKING CEDAR!!!! I. Was. Ecstatic. The very first thing that came to mind was shutters. We took down the old shutters we had up there to paint the siding and SURPRISE they broke :(. So I needed some new ones. It was time.... my heart longed for new shutters. I was sick with anticipation. There wad a hole inside me that I just couldn't fill..... Just kidding... but I really wanted to build some. So I sent the older kids to my mom's and while the baby slept I sat my butt in the driveway building shutters. Just me, my hammer and a box of nails. 

So here's where we started..
.

Notice the overgrown shrubbery and the awful "graige" siding color. Yuck. I really can't tell you how much I hated this house when we bought it. It just said BLAH. I am the complete opposite of BLAH. I rock pink hair most of the time. Ya know?!?! 

Getting all of the gigantic staples out of the planks was the hardest part. 


There were lots of these short pieces that I really had to sort through.I tried to get all of the good stuff out first. 


You can see them in there.. Just waiting to jab someone in the eye like some midevil torture tool. We had to take a hammer and bang out each one. No bueno but what can you do when you get free wood? Nothing. 

I used these long pieces for the base of the shutter. It helped it stay much stronger than our previous ones. 


All I did really was measure my window and cut the long boards to size. Then I laid them on my driveway and measure the width of the boards and cut 3 pieces to put on the top, bottom and the middle and secured them with 1.5 inch finish nails. 


My super technical method of measuring for the angled pieces is pictured above. I just laid it on there and marked the underside with a pencil so I knew where to cut my 45 degree angle. Easy peasy! 

Once everything was nailed on there I flipped it over and used  1.5 inch outdoor wood screws to screw through the back of everything.

Voila! I'll just leave you with this!


Tuesday, August 4, 2015

Choices Choices...


Flooring... UGH. 

Pouring over everything I can possibly find on laminate flooring is just not my idea of a good time. It has basically consumed my life entirely. I feel like I'm being sucked into this never ending black hole of flooring possibility... It's calling out to me like "HEY OVER HERE LOOK AT ME I'M SO PREEEEEETY". However I am on a budget. Like a teeny tiny ity bity I've thought about painting the subfloor and calling it good kind of budget... 

In a perfect world I would be buying these pretties! 


Drool... 


 SO MUCH DROOL!


OH MY HEAVENS BETSY! 

However those are all over 2 dollars a square foot and that doesn't include underlayment. SAD. So so sad... lol!!! 

I'm thinking I'm leaning more towards these... 


SO I took this picture from a review... I hope that is acceptable. We'll see. If I disappear for a while it's because I'm in internet jail. No biggie ;) 


This is called "Lake shore pecan" and it is pretty. It's not spectacular but it has the right colors and the price is only 

****DRUM ROLL PLEASE****

.79 cents. That we can do. 

Anyway it's not for sure yet and I have no idea what we'll end up buying but I am pretty sure that .79 beats 2.65 any day. Especially when your budget is pretty close to zero. ;) 

Check back later and see what we go with!

Sunday, August 2, 2015

Build A Lazy Susan


BUILD A LAZY SUSAN

I love lazy susans. They are so nice to have. Especially when you have a larger family. It makes the whole pass the salt thing very easy. I have very fond memories growing up of going to my friends houses and they would have big happy family dinners and there was always a big oak round lazy susan on the table that held all the essentials. When I had kids I got all warm and fuzzy thinking about those great memories and a few months ago I decided to go for it. 

All you need for this is:

1 turntable (like for spices in cupboards) from target
1 wood round from the hardware 
1 bit - o - glue 
spray paint in 2 colors 
a scrap piece of lace

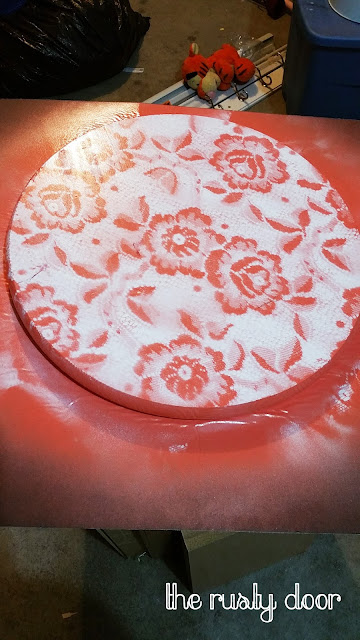
The very first thing I did was paint the round the base color. I am sure this would look fantastic stained with a white lace pattern on top but I didn't have poly at the time and just decided to paint it. The when it was dry i laid the lace over top.


 If the lace isn't tight you will get a sort of mistish look to your lace pattern so I just used my craft paints to hold it down and it did the trick nicely. 
Paint away! 
 There it is! I was a little more heavy handed with the white paint than I wanted to be but oh well. Looks pretty bitchin' to me! 

Let it dry and either clear coat or leave it be. Your choice. 
All I did to adhere it to the turntable was flip er over and glue it on. I left it there to dry for a few hours then put it on my table! Viola! 


Those roses came out of my yard! They're massive and I think I have grown about 50 by now. 
 

DIY kitchen Plank wall


 DIY PLANK WALL!!

Hello there everyone! Yes you. All 3 of you! Whoo Hoooo! 

J and I have been working on this one for a while now. I am so SO SOSOSOSOSOSOSOSO relieved that it is finally done. J has a funny way of telling me that he is fed up with a project. Take this one for example. We were trucking along great when on the very last piece, he stopped. Like not going to do anymore at all stopped. UGH. There is just somethings a girl needs a man to do for her. Like use a hammer above their head. I'm clumsy and I value my eyeballs so I need his manlyness for that. Anywho... It is done. I finished it this week. It wasn't very tricky to figure out. All you need is some basic math skills and you can figure it out pretty easily. 

Heres where we started. YUCK!
 
Nooooot very awesome. The cabinet on the floor was up next to the ones that are still attached. Use your imagination here. It was ugly nonetheless. We inherited this fridge and we hate it. It's seen better days and I am very much looking forward to demoting it to garage fridge. C'MON BLACK FRIDAY!  

The first thing we did was take a trip to the hardware and get about a million pieces of wood. I'm going to attempt to lay out the math here. Keep in mind everyones brain works differently lol. I confuse J daily with my mad math skills. SO you take the height of your ceiling in inches (sorry metric) and divide it by 3.5 (the width of a 1x4). That is how many boards you can use going up the wall. Now take your width measurement and multiply it by the amount of boards you will be putting on the length of the wall. The result of the first problem. I really hope I am making sense.  You will have a very huge amount of inches lol. You need to divide that large number by 12 to get the feet. Once you have the amount of feet you need you will need to divide that by 8 (being the length of a standard 1x4). That should give you the number of boards you need to buy. Ours was 19 and we used every single piece. 

The next step it to break out your collection of stains and get to work on that. 
I used rustoleum mineral green, minwax English chestnut, rustoleum weathered gray and varithane vintage aqua. I got a bunch of chip brushes and just threw them away after I used them. It saves my good Purdy's alot of wear and tear. 

OUr neighbor let us borrow his sawhorses so we didn't have to use Styrofoam lol. 
I just did an even amount of each color. Not included in this picture are the natural pieces that we just left alone. There were 4 of those. we chose to stain everything before cutting so it would go alot quicker and we wouldn't have little planks drying all over our yard.


We just used our miter saw to cut the pieces. We ended up using dividing the width measurement of the wall and it worked out pretty perfectly. 


So we had to deal with the cabinet being in the way. Hmm. It was interesting but we chose to have a small gap next to the cabinet since you really cant see it anyway and just used 2 boards across. Every other row we started with a half plank to give it a very uniform variation. In hind sight we would've started at the top but since we weren't using nails we started from the bottom and it turned out great. 

The hardest part is making sure you dont let any of the colors touch. I just sat behind the fridge and yelled at J which color to give me. We adhered each one with a liberal squeeze of liquid nails adhesive. That stuff is the bomb. diggity. 


Do you see what I am saying with the ONE plank he couldn't get up there AHHH! Also there was a gap so I had to put a piece of trim up there. 

We decided that the fridge now looked terrible and I hapened to have a fresh can of chalboard paint so we went for it. It's held up so fantastically on our fireplace I figured why not?!


 Annnnnnd we turned this cabinet into a pull out trash cabinet by moving the drawer glides to the bottom and attaching the drawer to the cabinet. Clever, I know.


Apparently we were a bit off with our measurement for the outlet lol. Kidding.


Seriously it's so so cool!  


SO there it is. So much has been done since this picture so I'll just leave you with the final all done photo one more time! 

Here ya go! 


DIY 30 dollar work bench

 DIY 30 DOLLAR WORK BENCH!!!!


Hey there internet. Long time no talk!!! 

SO J and I have been using this glorious wonder that is a sofa table as our miter saw bench. It has been really difficult for me to use a beautiful piece of furniture as a sawdust collector. SAD. Well as is usually the case one day recently I had enough and packed up all the kids and made the trek to Lowes to get some wood. I had my notebook in hand and I was ready to make a bench! That is how everything in this house starts. I get a whim and I'm off. J thinks I'm fearless lol. Maybe... I call it being a DO-ER.

SUPPLY LIST

1 4x8 sheet of OSB (oriented strand board) 
7 2x4's 
2.5 inch screws
3 inch screws 

After a ridiculous amount of time trying to track down a person to cut the wood down for us someone finally showed up! We had them cut the OSB in half length wise. So we had 2 sheets of OSB that were 2' x 8'. These will the the top. We have a miter saw so we did all the 2x4 cuts our selves. Our garage only lent its self to a 14 foot bench so we made one frame at 8 feet long and the other at 6 feet long. We didn't cut down our 8 foot long 2x4's

CUT LIST: 

1 OSB cut to 72"
2 - 2x4 cut to 2" 
10- 2x4 cut to 21"
6 - 2x4 cut at a 45 degree angle (long point to short point) 31"

Here is where it gets fun! INSTALLING IT! It helps if you have a partner to help you with this part unless you want to prop the frames up on tables or something. Good luck to you! These things are pretty heavy. So unless you're a logger with big burly man arms, get a buddy to help you out.

First up we made the frames. 

Im terribly sorry for the quality of these pictures. My camera wasn't charged for this whole project :(. 
Anyway the frame was very simple to put together we just laid everything out on the garage floor and screwed it together. We made 2 of them. The first at 6 feet and and the second at 8 feet so that when they were up and on the wall the entire bench would be 14 feet long. 

Installing them on the wall was fairly easy. I just held it up so it would sit at 36" on the wall (keep in mind J and I are short. He's 5'7 and I'm 5'4 so plan a height that works for you) and J used our 3 inch screws to secure it to the studs. Thankfully our garage has walls that aren't textured or painted so we were easily able to see them. Oh and we made sure it was level. That's important. 


Next we put the angle braces in to hold it to the wall. These are the 31" pieces that you cut at an angle. 
You'll notice that the point on top here has been lopped off. Well, we got everything up there and decided we wanted a nice tight fit so we snugged it up and just marked where the top of the frame was and took off that point. Easy peasy lemon squeezy! We secured them with our 2.5 inch screws through the front of the frame. J secured them to the wall with the 3 inch screws while I held it up to make sure the front was level with the back. 

Finally we secured the OSB to the top!

Annnnnnnd because it was like 7000 degrees in my garage I didn't take any pictures of it actually going onto the frame. SORRY! But here is the best I can do. I just secured it to the frame with 1.5 inch finish nails. Then I painted the frame and stained the top. About 5 coats of polyurethane later we had a functional bench! TADA!

After everything was dry I started adding all the fun stuff


A place for our speed square and all our pens and junk. That lonely screw on the right there holds our small level. 

J used to work at a major electrical supply company so he had about a hundred of these super strong magnets. I just screwed it on there and it holds that tape measure there pretty well! And no garage is complete without a bottle opener !!!

Here she is in all her glory! Not bad for a Saturday and 30 dollars! 


Again. Please excuse the nightmare going on under the bench. We're getting to that ;)