

Hello everyone! Happy Saturday!
This past week I was browsing the swap pages on facebook and I found a woman who was GIVING AWAY her old table for FREE. Yes. FREE!!! So I promptly begged Jordan who eventually said OK fine..
This baby was in rough shape.. It had apparently been stored in a garage for a long time and had really been HEAVILY used. It was just screaming for a bit of love.. So I obliged ;) I'm so nice like that!
I've had quite a few friends point me in the direction of a blog called "Sawdust & Embryos". The woman who writes it does wonderful stuff with stain to make art pieces so I thought I's give it a whirl...
I've had quite a few friends point me in the direction of a blog called "Sawdust & Embryos". The woman who writes it does wonderful stuff with stain to make art pieces so I thought I's give it a whirl...
I started by sanding the dickens out of the top until I was super duper sure that it was down to raw bare wood. I used pretty much every grit possible up to 220. It took forever...

Of course I just had to do it at night so I was nice to my neighbors and left my garage door closed which necessitated some sort of respirator lol. I'm so cool!! haha. Ikea napkins are the shit.. Just sayin!

So once that was done I had the big idea to try out a bit of stain art and I needed a concept drawing before I sketched it onto the table. This was the best I could do in pencil. I liked it well enough to move forward with it.

I LIGHTLY sketched the drawing onto the table and said a little prayer..

I literally almost had a panic attack when I was doing the first layer of stain. I kinda stepped back, freaked out hardcore and decided to go to bed. The next day I decided that it was a free table and I really couldn't mess up so bad that no body would like it lol. Art is art.. No matter what you do SOMEONE will love it.

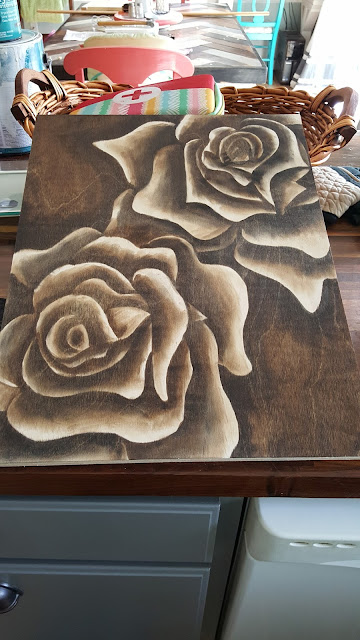
When I got this far I felt much better. I first stained it in Minwax English Chestnut then followed it up with some shading in Jacobean. It still didn't really feel done so I did some more shading in Rustoleum's Dark Cherry.

Here I have the bottom half shaded with the dark cherry. You can really tell the difference. I liked how it looked but I thought the "petals" just kinda were a bit lacking so I thought maybe some highlights would do the trick.

So I used some Rustolem stain in mineral green to highlight the petals. Then I took a water color brush from my stash and watered down some white acryllic paint. I went around the petals in places where I thought maybe actual light would hit a real flower. I finally felt finished so I painted the rim and gave it 3 coats of gloss poly!

I painted the base in Chalk Paint and gave it a good waxing to seal it up nicely.


There you have it. I love it. It looks so interesting.. Now if I can only sell it :)
****UPDATE: November 9, 2015. Still haven't sold the table...
Here's a few things I have done since this table and I have to say I am really getting the hang of this technique!
 This was a prototype I did for a big table.


 This is probably my favorite so far.
 A round table I did for a lady. I was a bit nervous at first to do such a light colored table but I think it turned out great!
****UPDATE: November 9, 2015. Still haven't sold the table...
Here's a few things I have done since this table and I have to say I am really getting the hang of this technique!


This is our new bench for our table.


