Wednesday, April 29, 2015

French Onion Chicken

 Oh look at that. Ain't she purty?!?!
I got a little carried away with the mushrooms but hey, they're my favorite fungus so it's cool.

Hey there loyal followers. All 3 of you!

Today I have a real treat for you. Like so good you're going to lick your plate when you're done with thirds kinda treat!!

 May I present.....

French Onion Chicken

yep. YUM! I mentioned before that we are on a diet. I saved my calories today for this culinary masterpiece... Though it really isn't that bad so theres some good news.. 
You want to know an amazing secret??? Campbell's french onion soup. I was pretty shocked when I tasted it but it's LEGIT. Seriously.. This stuff tastes pretty close to high quality homemade, took 3 hours, soup. It's really good. Did I mention it's good? Yes.. Well it is. I licked the pull off top of death. I risked slicing my tongue open! Which is no surprise because I'm just that hardcore..

So here you go blogland. Enjoy! I took a few pictures of the process but I'll explain along the way.

French Onion Chicken:

1 pound chicken breasts (fileted)
1 can Campbell's french onion soup
1 package crimini mushrooms
1/2 cup chicken stock (my favorite is Kitchen Basics. It's rich and flavorful) 
1 tbsp olive oil
1/2 cup flour 
salt and pepper
chives for garnish

1. filet your chicken breasts. Make sure they aren't like paper thin. Cut in half should be plenty fine. Salt and pepper each side of the chicken filets. 
2. Heat oil in a big skillet (I used cast iron) on medium high heat. Dredge your chicken in the flour and shake off the excess. Place them in the pan and cook until they are a nice golden brown. Flip them over and do the same. As soon as they're brown stick them on a plate to hang out until the sauce is ready. Its ok if they aren't cooked through. We'll get to that in a minute. 
3. throw your *sliced* mushrooms into the pan and cook until browned. 
4. Deglaze the pan by pouring in the soup and chicken stock and cook for about 1 minute to bring everything together. Scrape the bottom of the pan to get up all the yummy chicken bits that are hanging out.
5. Place the chicken back in the pan and flip once to coat in the sauce. Turn heat down to medium and allow to simmer until chicken is cooked through and the sauce starts to thicken. A good rule of thumb for reducing sauce is if it coats the back of a wooden spoon it's ready.
6. Give your self a high five because you just made dinner LIKE A BOSS!


Ok so I got to this point and I was like "Hey, Self, you should really be taking pictures right now because this is going to be the bomb!" Yes. I do talk like a teenager from the 90's in my head. I'm 27... I swear. 
Anyway. This is while deglazing the pan...

Adding the chicken back in... 


Little bit-o-garnish.. 


So this is another little gem from my kitchen to yours. I take out the chicken as soon as it's done rather than leaving it in the sauce while I get the plates ready. This keeps the chicken nice and moist.... Yuck. I hate that word. Even tying it give me the creepy crawlies. 


 Lonely sauce... 


Here she is. the first bite.... Hello my love... ANNNND that just made me think of Lloyd Christmas from dumb and dumber when he drops Mary off at the airport.. GOODBYE MY LOOOOOOVE! lol 

Anyway. Goodbye my loves. Until we meet again enjoy this recipe. It was damn good! My kids ate it and my 2 year old only eats pizza and crayons so that's saying something!

Monday, April 27, 2015

Pot Roast


Not so MISSISSIPPI pot roast


We're on a diet :(. So I am trying to come up with ways to still eat the stuff I love but still lose weight. I have been struggling with my blood sugar since I was pregnant with my third child so it's getting to that moment where its like either do it, or die. I like to live so I'm going with option A. J thinks he's fat too ( AHAHAHAHAHAHA) so he's joining me on the diet express. He's hilarious! Anyway... I love pot roast and I have seen all over Pinterest land these recipes for Mississippi pot roast (I feel like I am 5 again every time I write that word! I get all sassy up in my head. Yep. I'm 5.)  So I figured out a way to skinny it up a bit. It's not perfect but it's actually really good!

Also I was super sick for a few days. Like I'm dying, Seriously I'M DYING!!! sick. I still kinda am but I'm pretty much in denial so I thought a crock pot meal would be the best way to go (and not have to eat eggs for dinner because that's all J can cook).


So here's the recipe:

1 BIG sirloin pork roast
2 packets onion soup mix
1 packet ranch
1/2 cup chicken stock
5 pepper things ( I dont care to look up the proper spelling) 
Cilantro
Buns of choice
Herb Butter (as follows)

1 stick butter (margarine is what I used but I think butter would work too) 
1 tsp chives
1 tsp garlic powder
1 tsp onion powder
1 tsp dill

1. Place that big ole roast in your magical machine that is known as the slow cooker. Basically throw everything on top of it lol. I mixed the herb butter together then placed it on top so there wouldn't be any clumping

2. Cook on HIGH for about 6 to 8 hours. After about hour 6 you should shred it and put it back in the cooker. 

3. Take it out and put it on your buns of choice. 

4. ENJOY!!


Hello little ingredients! Get in my cooker!!!
 Garlic Herb Butter. Um yum. 


We used some buns I found at IGA. That is also some fat free (flavor free) swiss franken cheese. 

 
  There you go. Dinner. It wont break the calorie bank either. Unless of course you eat ALL of it. Which is very possible!!


PS. Did anyone notice some pretty sweet tile on our backsplash? J finally finished it this weekend inbetween loads of laundry.. Thanks Flu.

Monday, April 13, 2015

Chevron Table and benches

Hello all. 


Theres something you should know. I am a serial re-doer. It's a problem... I know... I get tired of things fairly quickly and I just decide to re-do them. It happens. Sadly our table was the latest victim of my disease. I hated how I had to scrape kid food junk out of all of the cracks between the wood so I asked J if we could take it apart and put liquid nails between the boards so maybe I could just wipe it out. It was a big fail. Like stuff was stuck worse than ever kind of fail. So back to the drawing board it was. I had seen on pinterest a blog post where a lady made a chevron headboard out of plywood and 1 x 4 boards that she had stained individually in different colors. COOL! I thought I must have one. So after literally no thought about it at all I was sending J to Lowes to get the loot.

He picked up 4 - 1x4's, 3 - 1x3's, 2 tubes of liquid nails, 3 different stain colors (we had a ton already), a giant tub of wood filler and a big box of finish nails. You know cuz we are too old school to buy a nail gun lol. 

I was so worried that this would be a huge fail again so I didn't really take a whole lot of photos of the process but I'll show you what I have. 

Here's our table before: 

I know super awesome instagram photo. This was a year ago. When we finished the top. It was a regular old farmhouse style made out of 2 x 6's. I loved it. Till recently lol. 

Here it is 2 years ago!: 

The very first redesign of the table. Just 1 x 8's pocket holed together. 

Here it is today. Again I didn't really take any photos of the process because I was worried it wouldn't turn out well. 


Yes that is mac n cheese on my floor. My daughter was sleeping and she picked it up after her nap. Thats how we roll. 

See. Clean floor.

This is so blurry but oh well. I did a 90 degree corner in the middle and just went from there. I knew I wanted it to be centered on the table so I just measured and cut as I went. I glued and finish nailed each piece to our existing table top. I wood filled every crack between the boards and trim. That was a b**** but it's a dining table that has 4 kids at it every day so I didn't want to do ANY more scraping. Nope. Not gonna.


I stained each board individually with an artist brush. It was time consuming but worth it. 

I used MINWAX: ebony, red mahogany and english chestnut, RUSTOLEUM: weathered grey and mineral green. 
I also sealed it with Polyurethane. About 9 coats!! Again. Kids...


We are in the process of building two benches to go on each side for the kids. We used an Ana White plan for the frame and we winged it for the top since we wanted the chevron thing to keep on going. So here are a few pictures of the top. 


If it were up to me I would keep it like this and just paint it to look like a sweet scaly dragon or something. J wouldn't be too impressed... Ahh marriage. 

Here he is scraping some junk off after the first time I mis-measured the trim. Whoopsie. It happens pretty much all the time. Atleast I try :D 

It sure did turn out awesome though!! 


I love it! 


Now we just have to finish them and get a top put on the other bench. Because no one likes a topless bench.

Friday, April 3, 2015

Painting our tile fireplace

Painting a tile fire place. 

There I said it. 

I totally did it too!!! Muahaha. But really it wasn't that hard and it has held up pretty well considering, you know, I have 4 kids... One of which is pretty much obsessed with cars and anything vehicle related. Our fireplace ledge is his "parking garage". So here we go. 

Step 1: Hate your fireplace secretly until you're about 8 months pregnant and cant handle life with it anymore. 


Step 2: Paint the brass surround in an attempt to make yourself feel better about it. 

I used barbecue paint that's meant for high heat. 

Step 3: Hate it still and decide to seriously overhaul it. 

For this I used Zinsser primer (water based) and ACE cabinet, door and trim paint in high hiding white. It's expensive but its so so worth it. 

Step 4: Admire your work but wait! The tile looks so much worse now! Eff word. OK what do I do? I have chalkboard paint? We'll try it out. 

I did pretty much the same deal as with the mantel. I scrubbed it decently and primed it heavily with the Zinsser. I think it was 3 coats.... 
 

 I then followed it with the chalkboard paint. So here's the deal with the paint. I have had that can of paint for almost 3 years. True story. 

This. Made. Me. Panic. I'm talking premature labor panic. Then 3 coats later.... 

I could breathe. It was beautiful... Like I wanted to take it to dinner good lookin. I added a piece of contact paper in that weird strip and left it for months! 

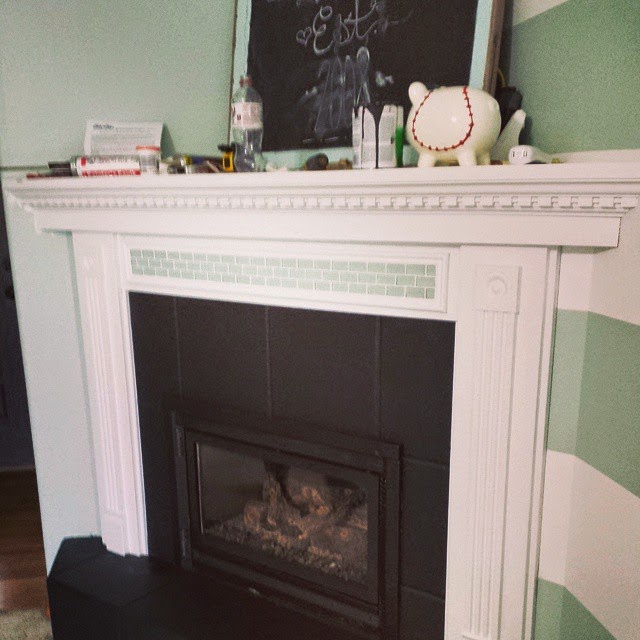
We have since ripped off the crown molding and put up this pretty dentil molding and I tiled that awkward rectangle with left over tile from our kitchen! 

So I think it looks pretty awesome! Don't mind all the junk up there. It's a high place to keep stuff away from our kids ;)

Here we are!

Hey there! I'm Briana and he's Jordan . We are a husband and wife team on a mission to remodel our outdated cheap-o lake house in the pacific northwest. The kicker... We have 4 kids. 6 and under so things get a little tricky and more than a little thrifty. We have already done so many things in this piece that I was worried I wouldn't have anything to talk about. Then I remembered that not once in my life have I ever run out of things to talk about. Truth. 

Anyway so here we are. I'm going to just jump right in. You'll have to excuse my less than awesome phone camera photos. We had a small fire in our bedroom in December (2014) that burned our desk so I didn't have enough memory on my camera cards to use it. Thankfully Jordan was a superstar and built me a fancy desk to hook my computer back up! Whoop Whoop! 

Here she is in all her glory...

Yep. Love it ;) Our house isn't very big so finding a spot to put it was uh... interesting...... but we figured it out. 
So here I am. Blogging. Here's a few projects that have been either completed or are in limbo until we can get to them. 

This is just a few of the more recent projects we have been working on.


 This was a closet. In a TINY. I repeat TIIIINNNNYYY entryway. I was not happy with that so I comissioned Jordan to rip that bad dog out and put this in. Thankfully I had a fairly expensive bench from target that I was able to sell and pay for the entire project! DIYer win! 

 These beauties added some much needed allure to our house. Shutters are like the eyeliner of the curb appeal world. 

 I bought this hutch off Craigslist for 120 bucks 3 years ago. I had previously painted the outside dark grey and the interior a bright mint color as well as took out all the glass panels and painted the brass hardware bronze. Well... It no longer matched so I re did it lol. It happens.

We like stripes. Seriously like them..
 Our kitchen **SWOON**.. It's awesome! We have very wonky ceilings so crown molding wasn't going to work so we used strips of MDF and dentil molding to fake it! It surprisingly turned out great! We are not finished painting at all. Like not even close... AT ALL, but I wanted to share a small peeky boo anyway.
 Our room. We have different bedding now lol but you get the idea. 

 This is our only full bath that is also our kids/ guest bath. Don't mind my reflection I was obnoxiously pregnant at the time of camera phoning.
 We have these gross builder oak window ledges on every window in the house. I find them annoying and i like to flip them the bird every time I walk by them. So enter MDF. we have 4 windows left to do and my middle finger can rest.

This beauty. we replaced the crown molding on it, painted the crusty tile and the oak mantle. For comparison here is a before. 

yep. 

So there it is. A few of the things we have been working on. I'm going to post some photos of the house that were in the real estate listing below. Take it in. Basque in it's plainness.. 

 The boy's room...


 Laundry. Not that you could tell... 


 Girls Room..


 Butlers quarters. Just kidding. The kitchen.
 Master bathroom and SURPRISE. It still looks like this...
 Master bedroom.
 Crusty faucet. **shutters**
this thing...
Our dining room? It's more like an extension of our living room that has different flooring.