Thursday, November 12, 2015

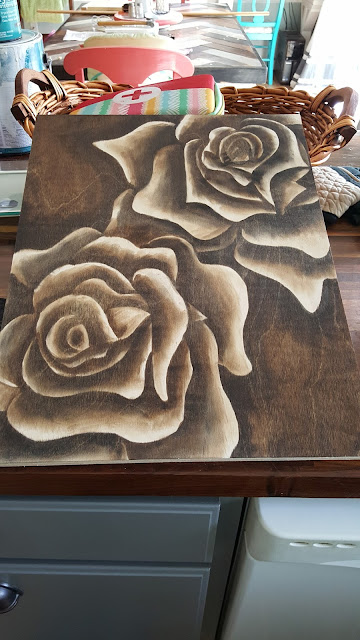
Stain Art Coffee Table


 Hello there! I've been wanting to do a post about this little beauty for a while but you know, life.... It happened. When I did this piece I wasn't really sure it was going to sell but boy was I wrong! I had it gone in minutes. Which left me feeling like I WAY under priced it but oh well. Live and learn.. 

I knew I wanted something other than a rose. NO MORE ROSES. So I got to thinking a bit and I thought... we live on a lake that is infested with lily pads (and big jerk bull frogs that keep you up all night)... Maybe I should do a water lily? I was struck with inspiration! A water lily seemed like a good idea. I was kind of skeptical at first but after selling it and getting all that feedback I am confident that it was a good decision. I'm always doubting my work. Truth is, I don't think I'm any good at this stuff but all I hear from others is that I am so I guess I'll keep on trucking.

  After my decision was made I ran to my craft hutch, pulled out my watercolor paper and got to work. My kids have annihilated every other kind of paper in the house so it was this or toilet paper. With a family of six toilet paper is like gold. I'm not kidding!  


My pretty little flower. Normally I do a big sketch with a whole lot of detail and shading, but I was just anxious to get this on to some wood. 


Here's the table we built all ready to get prettyfied! It was just a standard farmhouse coffee table made using pine boards and some turned legs. We built everything with the pocket hole jig and screws. It's a cutie! 


I got everything sketched onto the wood ( so sorry I didn't take a picture of that. I suck...) and I tweaked a few things with the design. Then I went to town! I used a dark walnut stain as the main color and ebony for the shading. Still it felt somewhat lacking and I just couldn't let it go... So I broke out my aqua stain and gave it some color. 

I mean it just makes all the difference in the world. That tiny bit of color makes it more realistic. I don't like my art to look too cartoon-ish so I was really happy when it started to look like a REAL flower. 


I had Jordan add a border of 1 x 2's and stained them with the same aqua. 3 coats of polycrylic later... There she is looking all purty. 

Thanks for stopping by guys! I'm enjoying this technique. Cant wait to do another!!!! **Spoiler Alert** I'm working on one now!

Tuesday, October 6, 2015

Entryway Overhaul

ENTRY WAY OVERHAUL! 

I've been dying to do a post about my entryway for a while. It's probably the room with the most change in our house. We started with a very small dark room with nothing but a coat closet. I imagine it's probably like every entryway in a house from the early 2000's.. Just kinda.. Blah. 

Well that's not my style! I wanted my entry to make a statement! So I told Jordan that I thought maybe we should just rip out the closet.. He laughed it off like "Oh, honey you're just so funny". Yep. Not joking people. I was on a mission ;). So after much begging and eventually pleading my case in front of the jury (Jordan) and killing it, I was able to get him to agree. 

So I don't have very awesome before photos because I literally never thought anyone would ever read my blog so it kind of never made it to the front of my mind during this stuff until recently. 


Ok so here you can see to the left is the open door that used to be Maroon! YUCK! It had oak flooring that was SOAKED in cat pee.. So it really had to go.  We started everything by ripping that out and tiling in some really pretty gray 12 x 24 tiles. These photo's are from the listing online.. Sorry...


On the far left here you can somewhat see the closet that was there. I'm now kicking myself for not taking before photos... 


Jordan started out by ripping out the flooring.. AGAIN IM SO SORRY ABOUT MY HORRIBLE PHOTOS!! As you can see there are so many black stains on the underside of the wood and let me tell you, nobody should have to smell what we had to. It was insane. 


We had to lay down some thinset, then concrete board then thinset again before we could lay the tile.. It seriously thickens up the floor. 


So we did things kind of backwards. We didn't initially decide to rip out the floor. After we discovered the cat pee halfway through plans changed. So We lifted the frame of the bench up on the wall and tiled under it. Like ninjas.. 


We used pocket holes to secure the frame together and glued the MDF pieces to the wall with extra strength liquid nails. 


The design of this bench kind of evolved in my mind and this "x" was born.. I was just going to frame it in with pieces of MDF and the beadboard by it's self behind it. It just looked too plain so we went for it. I think it adds that little extra oomph you know? 


We patched it, painted it and made a top for it out of 1x6's. The ledge at the top didn't look quite finished either so we added some cove molding and some dentil molding under that. Looks WAY more polished now. I used the wood shims as a kind of textural element to the wall but now I think I would like more of a planked look.. We'll see.


After we had everything in we repainted the room and started putting in new baseboards so the damn spiders would stop crawling in from under that walls. ***shutter***


We had a pretty serious drywall patch where we ripped out the closet. That was fun... 


Seriously HUGE. 


When we moved on to the ceiling we did a paneled ceiling. The picture above is a shining example of how a little miscommunication can turn ugly. OUr front door has a sidelight next to it and the entire door is centered with the arched doorway you see here. Well, I asked Jordan if he would cut the hole centered on the door and the arched openeing. I even said make sure you find the center point of the whole door. Well he thought I just meant the actual swinging door. Ugh... So enter the ceiling medalion... 


15 bucks later we covered the hole. It was hilarious. This is after Jordan discovered that there are no studs in our ceiling because of how the roof it pitched and all that was really holding up the corners of the drywall was a little tape and a lot of sorcery. So he had to use a bunch of scrap wood to reinforce the ceiling all while we have started paneling the ceiling and glue is actively drying!! It was an adventure and definitely a test of our marriage.  


This light... **SWOON** It's my new favorite thing in my house. It's so cute! It was stupid expensive so we only bought one and plan to buy the other later when we can justify spending that much again. Jordan installed my new sparkly and it looked just amazing with the medallion so I was pretty thrilled. 


Looking good pretty lady!~ 


So here's where we are now. It needs a bit more work and a bit more painting but it's coming along. I think I'll do a tutorial post when it is all done as well as a whole entry way reveal. We're inching along! 

Thanks for reading! 

Briana

Saturday, September 26, 2015

Stain Art Table


Hello everyone! Happy Saturday! 

This past week I was browsing the swap pages on facebook and I found a woman who was GIVING AWAY her old table for FREE. Yes. FREE!!! So I promptly begged Jordan who eventually said OK fine.. 

This baby was in rough shape.. It had apparently been stored in a garage for a long time and had really been HEAVILY used. It was just screaming for a bit of love.. So I obliged ;) I'm so nice like that! 

I've had quite a few friends point me in the direction of a blog called "Sawdust & Embryos". The woman who writes it does wonderful stuff with stain to make art pieces so I thought I's give it a whirl...

I started by sanding the dickens out of the top until I was super duper sure that it was down to raw bare wood. I used pretty much every grit possible up to 220. It took forever... 


Of course I just had to do it at night so I was nice to my neighbors and left my garage door closed which necessitated some sort of respirator lol. I'm so cool!! haha. Ikea napkins are the shit.. Just sayin! 


So once that was done I had the big idea to try out a bit of stain art and I needed a concept drawing before I sketched it onto the table. This was the best I could do in pencil. I liked it well enough to move forward with it.


I LIGHTLY sketched the drawing onto the table and said a little prayer.. 


I literally almost had a panic attack when I was doing the first layer of stain. I kinda stepped back, freaked out hardcore and decided to go to bed. The next day I decided that it was a free table and I really couldn't mess up so bad that no body would like it lol. Art is art.. No matter what you do SOMEONE will love it. 


When I got this far I felt much better. I first stained it in Minwax English Chestnut then followed it up with some shading in Jacobean. It still didn't really feel done so I did some more shading in Rustoleum's Dark Cherry. 


Here I have the bottom half shaded with the dark cherry. You can really tell the difference. I liked how it looked but I thought the "petals" just kinda were a bit lacking so I thought maybe some highlights would do the trick. 


So I used some Rustolem stain in mineral green to highlight the petals. Then I took a water color brush from my stash and watered down some white acryllic paint. I went around the petals in places where I thought maybe actual light would hit a real flower. I finally felt finished so I painted the rim and gave it 3 coats of gloss poly! 


I painted the base in Chalk Paint and gave it a good waxing to seal it up nicely. 


There you have it. I love it. It looks so interesting.. Now if I can only sell it :) 

****UPDATE: November 9, 2015. Still haven't sold the table...

Here's a few things I have done since this table and I have to say I am really getting the hang of this technique!  

 This was a prototype I did for a big table. 


 This is our new bench for our table. 


 This is probably my favorite so far. 


A round table I did for a lady. I was a bit nervous at first to do such a light colored table but I think it turned out great!

Friday, September 25, 2015

Bathroom Bathroom

My Big Fat Bathroom Makeover


So as is my way I get a wild hair and I decide that today is the day we start to remodel the bathroom. My poor poor husband... 

I looked into everything it would take to just give it a good overhaul. I mean we had already updated it quite a bit but it just felt lacking. We had a perfectly sized piece of butcher block left over from the kitchen remodel (that's still not done....) so I thought YES we're getting this done and checked off! 

My Plan:

New counter top with undermount sink
new bronze faucet (not painted myself) 
backsplash tile
vinyl tile the floor
baseboards and door casings

So we went ahead and bought a new sink, faucet, door casing set, baseboards, shoe molding and vinyl tiles. We had EVERYTHING else left over from other projects lol. Yep. We're that awesome! 


I started out by painting the cabinet with Annie Sloan chalk paint in duck egg. It's a great color!  I also test fitted the floor.I wanted an herringbone pattern for a little more wow factor. This picture has the tile already up and counter on lol. I'm awesome at pictures..


Heres the flooring I used. I got it at lowes and it was 1.08 sq ft  at my local store.  I took each tile and cut it in 3 pieces with a razor knife.


This was probably the most important part. MAKE SURE EVERYTHING IS SQUARE!!!!! Seriously though. I'm a total free spirit so precision is really not my forte but it will look so ridiculous if your triangles are curved.. TRUST ME! I used 1/8 in spacers for this too. That's a huge help in keeping everything square.


It went down really fast.. Just took a good deal of patience! 


 Jordan cut the sink hole out per the template provided. We bought a rectangle undermount sink that was interesting to install. The first one we installed was cracked and I didn't notice until I went to do the final clean up on it so we had to rip it off and exchange it. Yay. 


We didn't like the chippy oak side panel so we slapped a left over piece of beadboard from our paneled entry ceiling (that post is coming!) on there and BAM instant upgrade! lol. We used 5.5 inch MDF as the trim around the bottom and we achieved this by screwing 4 pieced of 2x4 to the toe kick to give us something to nail the mdf to. Worked out well... 


I really think it looks nice and custom. Like we bought it and just set it there! My handy little helper there was trying to eat the cotton balls ;) 


Counter top on and waiting on faucet placement! Our sink ended up being really big so we had to put the faucet closer to the wall than was desirable but what can ya do?


I had to fill some holes and I (a big ole idiot) filled them with LIGHT colored wood filler.. Ugh.. It's barely noticeable until you throw some tung oil on there and HOLY WOW IS IT NOTICEABLE!! I sanded it back down as much as I could and it's barely there now..


My main man installing the faucet. We used a spade bit to drill the holes. 


There she is. All gorgeous and stuff.. Awww.. 


So there you have it.. Minus 1 drawer that someone (shh me) stripped a screw on...  

Now to decorate!


 My daughter actually took this photo :) :) 


I got all of these letters in the clearance section at Michael's whooo hooo! 


My shelves needed a bit of love too.. 

You guys ready for some before?


This is what it looked like when we bought it... Oh boy...